• Home
  • Crafts
  • Crochet
    • Crochet Dishcloth Patterns
    • Crochet Headband Patterns
    • Crochet Baby Hat Patterns
    • Crochet Dish Towel Patterns
  • Recipes
    • Best Rice Krispie Treats
    • How To Blanch Hazelnuts
    • Mini Pumpkin Pies with Graham Cracker Crust
  • Lifestyle
    • Travel
    • Blogging Tips
↑

Midwestern Moms

Life Captured

  • Home
  • Crafts
  • Crochet
    • Crochet Dishcloth Patterns
    • Crochet Headband Patterns
    • Crochet Baby Hat Patterns
    • Crochet Dish Towel Patterns
  • Recipes
    • Best Rice Krispie Treats
    • How To Blanch Hazelnuts
    • Mini Pumpkin Pies with Graham Cracker Crust
  • Lifestyle
    • Travel
    • Blogging Tips
You are here: Home / Recipes / LEGO Rice Krispie Treats Recipe – MiniFig Edition

LEGO Rice Krispie Treats Recipe – MiniFig Edition

Recipes

This post may contain affiliate links. If you make a purchase through one of these links, I do receive commission. For information, read my full privacy policy. Before reading our posts, please review our disclaimer.

Jump to Recipe
LEGO Rice Krispie Treats

Want unique LEGO rice krispie treats for a LEGO themed birthday party? These MiniFigs will be perfect! Everyone will enjoy these soft delicious treats!

LEGO Rice Krispie Treats arranged on a white square plate. The table has scattered with real LEGOs.

For my son’s 6th birthday party, we had a LEGO themed party for him. He loves all things LEGO.

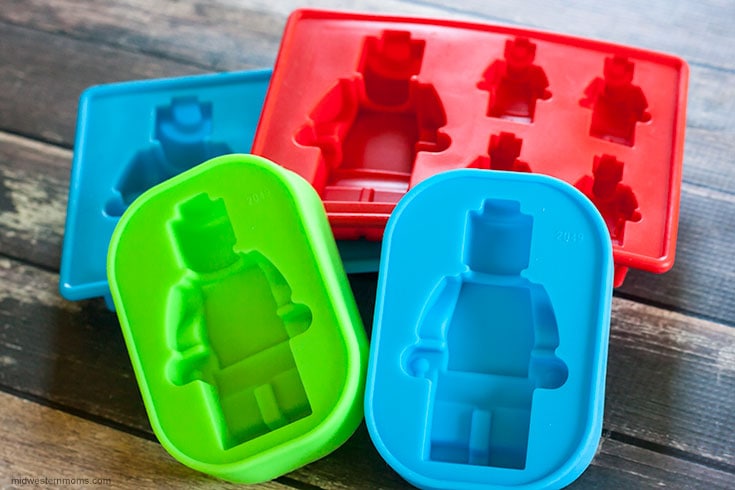
When I found these LEGO-inspired silicone molds, I had to get them and see what all I could make with them.

Lego Molds
Lego Molds
Buy from Amazon Learn More
We earn a commission if you click this link and make a purchase at no additional cost to you.

Of course, rice krispie treats were number one on my list to make with the large figure mold.

How to Create LEGO Figure Rice Krispie Treats

Before you start, make sure you have these 4 items handy:

  • non-stick spray
  • wax paper
  • large cookie sheet
  • cling wrap.

After making your treats, it is time to mold them. Grab the large figure silicone molds.

Large LEGO Figure Molds

Before putting any of the treats in the molds, spray the insides with non-stick spray. This will allow the treats to come of the molds easier.

As you work, you may need to re-spray the molds when the treats start to stick.

Using a spoon dip out some of the treat mixture and put it in the molds. Spray a spatula with non-stick spray and use it to press the treats into the shapes.

LEGO treats in the molds

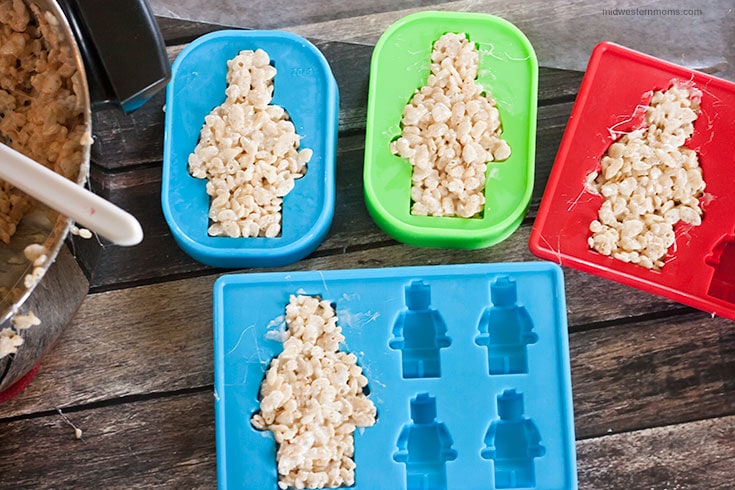
After you have them filled, gently push the figures out from the mold and lay them on wax paper.

Work quickly to get all the figures formed. As the treat mixture cools, it will be harder to work with.

I was able to make 21 figures from my batch of treats.

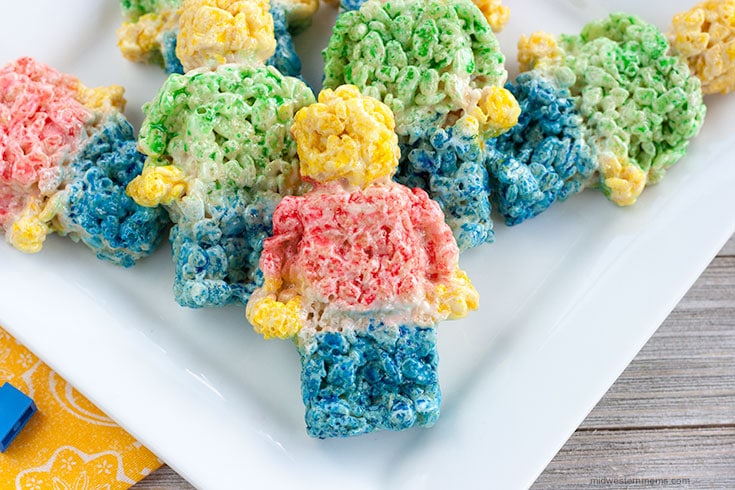
To add color to the figures, you will need Wilton Color Mist in the following colors: yellow, green, red, and blue.

 Wilton Color Mist, BlueBuy on Amazon Wilton Color Mist, YellowBuy on Amazon Wilton Green Color MistBuy on Amazon Wilton Red Color MistBuy on Amazon

Now comes the fun part.

Place wax paper on the large cookie sheet. Lay some of the treats on the wax paper, however, spread them out. You do not want them too close together.

Why use a cookie sheet? I found out that the color mist will bleed through the wax paper. YIKES! So a cookie sheet will protect your surfaces.

I used the cling wrap to cover the areas I didn’t want be yellow. So I covered the shirt and the legs. I cut small sections of the cling wrap to do this.

Then I sprayed the head and hands yellow.

Treats head and hands sprayed yellow.

Repeat the process for the shirt and pants. I used the cling wrap to cover the areas of the figure I didn’t want whatever color I was using.

Make sure you let them dry completely before putting the treats away. I found it was best to make these the day before they are needed.

Close up of Lego figure rice krispie treats on a white plate.

[socialpug_tweet tweet=”Super Cute LEGO Rice Krispie Treats! #foodie #recipe #LEGO” display_tweet=”Super Cute LEGO Rice Krispie Treats!”]

LEGO Rice Krispie Treats Recipe

Easy recipe to make delicious LEGO minifig rice krispie treats. Check out these tips should you need help with your treats.

Print
clock clock icon cutlery cutlery icon flag flag icon folder folder icon instagram instagram icon pinterest pinterest icon facebook facebook icon print print icon squares squares icon heart heart icon heart solid heart solid icon
LEGO Rice Krispie Treats

LEGO Rice Krispie Treats

  • Author: Midwestern Moms
  • Prep Time: 5 minutes
  • Cook Time: 10 minutes
  • Total Time: 15 minutes
  • Yield: 21 treats 1x
  • Category: Dessert
  • Method: No-Bake
  • Cuisine: American
Print Recipe
Pin Recipe

Description

Perfect treats for a LEGO Enthusiast! Great for parties or dessert.


Ingredients

Scale
  • 4 tablespoons of butter
  • 8 cups of mini marshmallows
  • 1 teaspoon of pure vanilla extract
  • 1 tablespoon of milk
  • 6 cups of Rice Krispie Cereal
  • LEGO inspired molds
  • Wilton Color Mist – Yellow
  • Wilton Color Mist – Red
  • Wilton Color Mist – Blue
  • Wilton Color Mist – Green

Instructions

  1. Slowly melt the butter in a large pan, low heat.
  2. Once butter is melted, add vanilla and 6 cups of marshmallows. Melt the marshmallows slowly.
  3. Right before the marshmallows are fully melted, add milk and the other 2 cups of marshmallows. Stir until the added marshmallows are starting to melt. (we don’t want them fully melt so you will have a lumpy fluff)
  4. Add the Rice Krispie Cereal. Stir until the cereal is fully coated with the marshmallow fluff.
  5. Spray the molds with non-stick spray.
  6. Using a spoon add some treat mixture to the mold and use a spatula (sprayed with non-stick spray) to press the treats into the molds.
  7. Gently remove the treats from the molds and place on wax paper. Work quickly to form all the treats before they cool.
  8. Line a large cookie sheet with wax paper. Lay some figures on the sheet leaving room between them.
  9. Cover the areas with cling wrap that  you don’t want to be the color you are using. Then spray the area. (See post for clearer instructions.)
  10. Repeat #9 for each color spray. Remember to cover the areas you don’t want spray.
  11. Allow to air dry before storing.
  12. If you are making these for a party, I highly suggest do these the day before to allow for then to sit out and air dry.

Notes

Adding color to the treats is optional. It is ok to leave them the natural rice krispie treat color if you wish.

Keywords: Lego rice kripsie treats, lego rice crispy treats

Did you make this recipe?

Tag @devcops on Instagram and hashtag it #midwesternmoms

More Rice Krispie Treat Recipes

  • The BEST Rice Krispie Treat Recipe EVER!
  • Toffee Rice Krispie Treats Recipe
  • Pokemon Rice Krispie Treats
  • Sailboat Rice Krispie Treats Recipe

Filed Under: Recipes

About Devon

Devon is a work at home mom and owner/editor at Midwestern Moms. In her spare time, you can find her hanging out with her family, curled up with her Kindle Fire, or playing computer games with her hubby.

Leave a Reply Cancel reply

Your email address will not be published.

Recipe rating ★☆ ★☆ ★☆ ★☆ ★☆

This site uses Akismet to reduce spam. Learn how your comment data is processed.

Devon from Midwestern Moms

Hi. I'm Devon.

Midwestern mom of two boys. I love recipes, DIYs, crochet, essential oils, and coffee! Read More About Midwestern Moms

Reader's Favorites

  • homemade bisquick Easy Homemade Bisquick
  • How to Blanch Hazelnuts. Hint: It is pretty easy! How To Blanch Hazelnuts
  • How to make a paper shamrock How to Make a Paper Shamrock
  • Delicious Cajun Chicken Alfredo that is full of flavor and easily made in the slow cooker! Slow Cooker Cajun Chicken Alfredo Recipe
  • Crochet Shamrock Pattern How To Crochet A Shamrock
As an Amazon Associate, I earn from qualifying purchases.
  • About
  • Disclosure Policy
  • Privacy Policy
  • Recipes
  • Crafts
  • Crochet

Copyright © · Midwestern Moms | Missouri | All Rights Reserved


Midwestern Moms is owned by Copsey Media, LLC
Copyright ©2021, Midwestern Moms. All Rights Reserved. Design by Pixel Me Designs
This site uses cookies: Find out more.