• Home
  • Crafts
  • Crochet
    • Crochet Dishcloth Patterns
    • Crochet Headband Patterns
    • Crochet Baby Hat Patterns
    • Crochet Dish Towel Patterns
  • Recipes
    • Best Rice Krispie Treats
    • How To Blanch Hazelnuts
    • Mini Pumpkin Pies with Graham Cracker Crust
  • Lifestyle
    • Travel
    • Blogging Tips
↑

Midwestern Moms

Life Captured

  • Home
  • Crafts
  • Crochet
    • Crochet Dishcloth Patterns
    • Crochet Headband Patterns
    • Crochet Baby Hat Patterns
    • Crochet Dish Towel Patterns
  • Recipes
    • Best Rice Krispie Treats
    • How To Blanch Hazelnuts
    • Mini Pumpkin Pies with Graham Cracker Crust
  • Lifestyle
    • Travel
    • Blogging Tips
You are here: Home / Crafts / How To Make A Wreath

How To Make A Wreath

Crafts

This post may contain affiliate links. If you make a purchase through one of these links, I do receive commission. For information, read my full privacy policy. Before reading our posts, please review our disclaimer.

I have always wondered about how to make a wreath. The only time I really think about them is during the holidays. I am more of a person that hangs one up for Christmas time and that is it. Maybe, since I found out how easy it is to make wreaths, I may try my hand at a few different ones now.

How to make a wreath

What you will need:

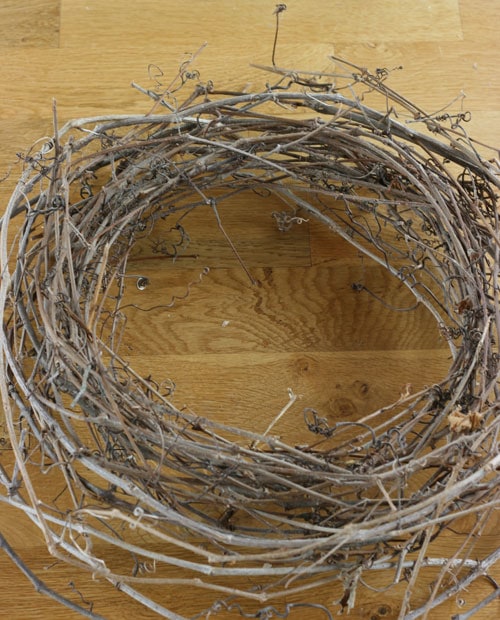
  • Grapevine (if you don’t have access to dried grapevine, you can purchase pre-made grapevine wreaths)
  • Wire
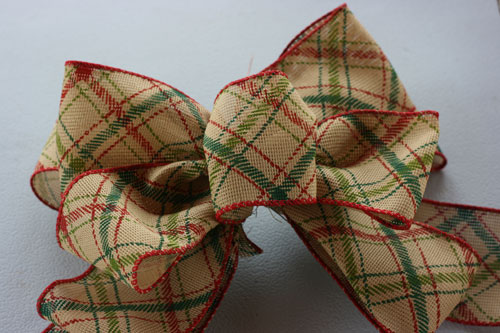
  • Ribbon – Make sure it has wire in it
  • Ornaments
  • Wire Cutters

Step 1: Take your dried grapevine and wrap it around in a wreath shape. Keep weaving it around itself until you have made it to the size you want it. Great thing about it? You don’t need wires to keep it together! If you don’t have access to grapevine and you purchased one, skip this step)

How to make a wreath - Step 1

Step 2: Take your ribbon and make your bow. If you need help with making a bow, I used this video.

How to make a wreath - Step 2

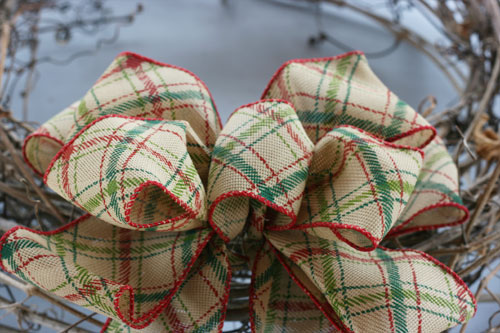
Step 3: Attach the bow to the bottom part of the wreath with wire.

How to make a wreath - Step 3

Step 4: Tie 4 of the Christmas Ornaments together with some wire.

How to make a wreath - Step 4

Step 5: Attach the bunch of ornaments to the wreath on one side of the bow with wire. Repeat steps 4 and 5 for the other side.

How to make a wreath - Step 5

Guess what? We are all done! The wreath will fit into a wreath door hook so you don’t even have to worry about attaching something to hang it.

How to make a wreath

Have you ever made your own wreaths? When do you normally hang wreaths?

Filed Under: Crafts

About Devon

Devon is a work at home mom and owner/editor at Midwestern Moms. In her spare time, you can find her hanging out with her family, curled up with her Kindle Fire, or playing computer games with her hubby.

Comments

  1. Robin says

    November 16, 2014 at 7:26 pm

    This is beautiful. Love it and you make it seem so simple to make! I will have to try this. Thanks Devon!

    Reply
  2. MryJhnsn (@mryjhnsn) says

    November 17, 2014 at 10:44 am

    My first job was at a craft store and I never thought to make my own grapevine wreath! Well done and love the ornaments :)

    Reply
  3. Earl-Leigh says

    November 17, 2014 at 1:39 pm

    This is so pretty and classy! I’ve been afraid to work with grapevine but I’m going to give it try now.

    Reply
    • devon says

      November 17, 2014 at 1:54 pm

      The wreath really was easy to make. Give it a try!

      Reply
  4. Kristen Kelly says

    November 17, 2014 at 4:21 pm

    I love Christmas crafts! I never would have thought making a wreath would be so easy!

    Reply
  5. Malinda threatt says

    March 6, 2017 at 5:41 pm

    How long do you let grapevines dry out. I just trimmed old grape vine that hadn’t been cut back in years. I have enough grape vines to start a business! I made wreath with green vines and it did pretty well but then I saw you advice to use dried vines. I want to make them right. Please let me know.

    Reply
    • devon says

      March 6, 2017 at 5:49 pm

      Hello Malinda.

      I think it really depends on the look you want. You can go ahead and make them when they are green and let them dry. It would give you a tighter looking wreath.

      Or if you want more breaks in the vine to make a rustic type of look, wait till they are dry or almost dry (with a bit of play where they don’t break as easy).

      I am trying to remember when we made this wreath, I think the vines were almost dried up (towards the end of the year) before we even cut them. They may have sat out for a week, give or take.

      Reply

Leave a Reply Cancel reply

Your email address will not be published.

This site uses Akismet to reduce spam. Learn how your comment data is processed.

Devon from Midwestern Moms

Hi. I'm Devon.

Midwestern mom of two boys. I love recipes, DIYs, crochet, essential oils, and coffee! Read More About Midwestern Moms

Reader's Favorites

  • Delicious Cajun Chicken Alfredo that is full of flavor and easily made in the slow cooker! Slow Cooker Cajun Chicken Alfredo Recipe
  • How to Blanch Hazelnuts. Hint: It is pretty easy! How To Blanch Hazelnuts
  • The BEST Rice Krispie Treats EVER! This recipe makes your treats into ooey gooey goodness! You will never make the original recipe again! The BEST Rice Krispie Treat Recipe EVER!
  • The start of my temperature blanket, about the first 7 rows completed. How to Crochet a Temperature Blanket
  • Free Crochet Dishcloth Pattern Half Double Crochet Dishcloth Pattern
As an Amazon Associate, I earn from qualifying purchases.
  • About
  • Disclosure Policy
  • Privacy Policy
  • Recipes
  • Crafts
  • Crochet

Copyright © · Midwestern Moms | Missouri | All Rights Reserved


Midwestern Moms is owned by Copsey Media, LLC
Copyright ©2021, Midwestern Moms. All Rights Reserved. Design by Pixel Me Designs
This site uses cookies: Find out more.