• Home
  • Crafts
  • Crochet
    • Crochet Dishcloth Patterns
    • Crochet Headband Patterns
    • Crochet Baby Hat Patterns
    • Crochet Dish Towel Patterns
  • Recipes
    • Best Rice Krispie Treats
    • How To Blanch Hazelnuts
    • Mini Pumpkin Pies with Graham Cracker Crust
  • Lifestyle
    • Travel
    • Blogging Tips
↑

Midwestern Moms

Life Captured

  • Home
  • Crafts
  • Crochet
    • Crochet Dishcloth Patterns
    • Crochet Headband Patterns
    • Crochet Baby Hat Patterns
    • Crochet Dish Towel Patterns
  • Recipes
    • Best Rice Krispie Treats
    • How To Blanch Hazelnuts
    • Mini Pumpkin Pies with Graham Cracker Crust
  • Lifestyle
    • Travel
    • Blogging Tips
You are here: Home / Crafts / Etched Glass Snowflake

Etched Glass Snowflake

Crafts

This post may contain affiliate links. If you make a purchase through one of these links, I do receive commission. For information, read my full privacy policy. Before reading our posts, please review our disclaimer.

Etched-Glass-Snowflake

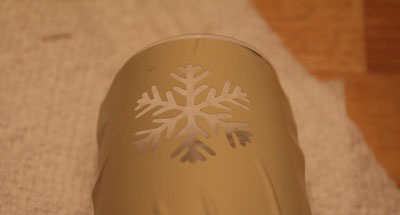
From the moment that I discovered Armour Etch I have been creating unique gifts for my friends and family by etching glass. My Cricut makes it very easy to cut a stencil into vinyl, which adheres to the glass well and creates a perfect etch every time. Today I downloaded a snowflake and decided to put it on a champagne glass. I plan on creating a set of these for some friends to give away with a bottle of champagne for Christmas presents.

Supplies:

  • Glass
  • Armour Etch
  • Paper Towel
  • Vinyl
  • Cricut
  • Snowflake cartridge or a pattern to download into a software like Sure Cuts a Lot
  • Foam Brush

Instructions:

Step 1:  Using your cutting machine, cut a snowflake template into vinyl.

Snowflake Cut

Step 2:  Apply the vinyl stencil to clean glass.

Vinyl

Step 3:  Apply a generous amount of Armour Etch to the area using a foam brush. Let sit for 5-7 minutes. Be sure to read the instructions fully on the Armour Etch as it is dangerous if it comes into contact with your skin. Never use around children.

Etch

Step 4:  Run water over the area, rinsing the etch off of the glass. Remove the stencil and dry.

This project is a very fast project and I think the result comes out looking very sharp. Imagine the possibilities!

I hope you loved this project and will stop over to visit Amber’s project for today – a paper snowflake!

Filed Under: Crafts

About amanda

Amanda is a work at home mom and owner/editor of Midwestern Moms. She enjoys reading, crafting and finding great new projects on Pinterest!

Comments

  1. Amber says

    December 19, 2011 at 8:39 am

    this is so pretty!

    Reply
  2. BusyWorkingMama says

    February 2, 2012 at 10:32 am

    How fun! I never knew you could do something like this yourself. Great tutorial!

    Reply

Leave a Reply Cancel reply

Your email address will not be published.

This site uses Akismet to reduce spam. Learn how your comment data is processed.

Devon from Midwestern Moms

Hi. I'm Devon.

Midwestern mom of two boys. I love recipes, DIYs, crochet, essential oils, and coffee! Read More About Midwestern Moms

Reader's Favorites

  • How to Blanch Hazelnuts. Hint: It is pretty easy! How To Blanch Hazelnuts
  • Delicious Cajun Chicken Alfredo that is full of flavor and easily made in the slow cooker! Slow Cooker Cajun Chicken Alfredo Recipe
  • The BEST Rice Krispie Treats EVER! This recipe makes your treats into ooey gooey goodness! You will never make the original recipe again! The BEST Rice Krispie Treat Recipe EVER!
  • Crochet Heart Pattern How To Crochet A Heart Plus DIY Heart Garland
  • 20 Adorable Free Crochet Baby Hat Patterns Free Crochet Baby Hat Patterns
As an Amazon Associate, I earn from qualifying purchases.
  • About
  • Disclosure Policy
  • Privacy Policy
  • Recipes
  • Crafts
  • Crochet

Copyright © · Midwestern Moms | Missouri | All Rights Reserved


Midwestern Moms is owned by Copsey Media, LLC
Copyright ©2021, Midwestern Moms. All Rights Reserved. Design by Pixel Me Designs
This site uses cookies: Find out more.