• Home
  • Crafts
  • Crochet
    • Crochet Dishcloth Patterns
    • Crochet Headband Patterns
    • Crochet Baby Hat Patterns
    • Crochet Dish Towel Patterns
  • Recipes
    • Best Rice Krispie Treats
    • How To Blanch Hazelnuts
    • Mini Pumpkin Pies with Graham Cracker Crust
  • Lifestyle
    • Travel
    • Blogging Tips
↑

Midwestern Moms

Life Captured

  • Home
  • Crafts
  • Crochet
    • Crochet Dishcloth Patterns
    • Crochet Headband Patterns
    • Crochet Baby Hat Patterns
    • Crochet Dish Towel Patterns
  • Recipes
    • Best Rice Krispie Treats
    • How To Blanch Hazelnuts
    • Mini Pumpkin Pies with Graham Cracker Crust
  • Lifestyle
    • Travel
    • Blogging Tips
You are here: Home / Crafts / Ribbon Bracelet – Girl Gift

Ribbon Bracelet – Girl Gift

Crafts

This post may contain affiliate links. If you make a purchase through one of these links, I do receive commission. For information, read my full privacy policy. Before reading our posts, please review our disclaimer.

For my girl gift idea, I decided to focus on creating a ribbon bracelet. Since I save everything in my house for a potential craft project, let’s just say that it was easy for me to find some broken necklaces that contained these beads.  This is a very quick project that is fun and also looks very cute on girls.

Ribbon Bracelet Craft

Supplies:

  • Beads
  • Ribbon
  • Embroidery Thread
  • Scissors
  • Needle

Instructions:

Step 1: Gather your supplies. I put mine in a box so that the beads don’t roll all over the place and nothing gets lost. With small dogs and children in the house, I like to try to prevent any of my craft projects from being eaten.

Supplies

Step 2:  Thread your needle with the embroidery floss. Embroidery floss comes in 6 individual strands wrapped in one, so you can separate them as you need for your projects. For this project, I pulled 4 strands and threaded them through my needle. You will then knot the end of your thread and begin to thread your ribbon.
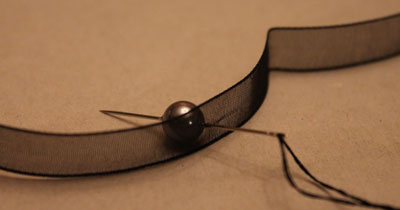
Threading

Step 3:  Continue to thread the beads onto the ribbon. I chose to thread mine front to back to get the effect of the ribbon going through the beads, however you can also bunch the ribbon between the beads if you wish, as shown in this inspiring tutorial that I found at Oh So Crafty. When you get a few beads on, knot the end of your ribbon as close to the last bead as possible. I also tie my thread through this, giving it extra stability.
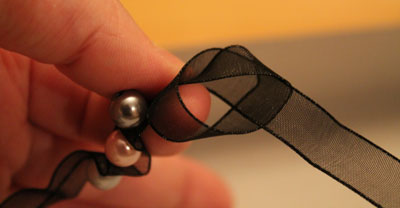
tie

Step 4:  Once you are complete and have the bracelet the desired length that will fit around the wrist of the girl you are making it for, tie off the other end. Tie the ends of the ribbon in a bow and trim the ribbon to an angle. I always use Fray Check or heat seal the ends of the ribbon so they don’t unravel. To heat seal simple run the end of the ribbon across an open flame quickly, being careful not to set it on fire.
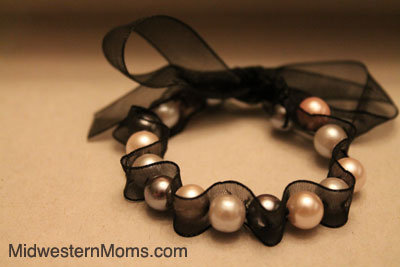
Finished Bracelet
I hope that you have enjoyed our girl craft for the day!

Filed Under: Crafts

About amanda

Amanda is a work at home mom and owner/editor of Midwestern Moms. She enjoys reading, crafting and finding great new projects on Pinterest!

Comments

  1. Shairbearg says

    December 7, 2011 at 8:59 am

    I totally love this idea!!! Thanks for sharing

    Reply
  2. Amber says

    December 7, 2011 at 9:28 am

    This is so cute..and elegant.

    Reply
  3. Jennifer S says

    December 7, 2011 at 5:11 pm

    That’s really cute! Love the idea!

    Reply
  4. Sarah Weygand says

    January 27, 2013 at 6:28 pm

    Hi! This is so cute but Ive been having a lot of trouble with it! Do you use bigger beads/ribbon? Im using smaller pearls and I just cant seem to gather the ribbon well. I also cant keep the bracelet from twisting…help!

    Reply
    • amanda says

      January 28, 2013 at 7:17 am

      The beads that I used I would consider to be pretty big. They were almost the same thickness as the ribbon. That might help you some when gathering.

      Reply
  5. wanda says

    January 29, 2013 at 8:01 pm

    great idea, simple and easy

    Reply
  6. Carole says

    February 14, 2013 at 10:09 pm

    I love this idea it looks brill

    Reply

Leave a Reply Cancel reply

Your email address will not be published.

This site uses Akismet to reduce spam. Learn how your comment data is processed.

Devon from Midwestern Moms

Hi. I'm Devon.

Midwestern mom of two boys. I love recipes, DIYs, crochet, essential oils, and coffee! Read More About Midwestern Moms

Reader's Favorites

  • Delicious Cajun Chicken Alfredo that is full of flavor and easily made in the slow cooker! Slow Cooker Cajun Chicken Alfredo Recipe
  • Crochet Heart Pattern How To Crochet A Heart Plus DIY Heart Garland
  • How to Blanch Hazelnuts. Hint: It is pretty easy! How To Blanch Hazelnuts
  • The BEST Rice Krispie Treats EVER! This recipe makes your treats into ooey gooey goodness! You will never make the original recipe again! The BEST Rice Krispie Treat Recipe EVER!
  • Free Crochet Dishcloth Pattern Half Double Crochet Dishcloth Pattern
As an Amazon Associate, I earn from qualifying purchases.
  • About
  • Disclosure Policy
  • Privacy Policy
  • Recipes
  • Crafts
  • Crochet

Copyright © · Midwestern Moms | Missouri | All Rights Reserved


Midwestern Moms is owned by Copsey Media, LLC
Copyright ©2021, Midwestern Moms. All Rights Reserved. Design by Pixel Me Designs
This site uses cookies: Find out more.