How to Copyright Photos in Photoshop
This post may contain affiliate links. If you make a purchase through links on our site, we may earn a commission. As an Amazon Associate, I earn from qualifying purchases.
If you think adding a simple watermark to your photos is a good way to add a copyright to your photos, think again. I used to think just adding a watermark was good enough. As bloggers, we take the time to create eye catching photos for our posts and we take great pride in them. Nothing hurts more than when we see another person using the photo we worked so hard on. I know this from experience. I had a person with a great following take a photo, crop the watermark out and tried to pass it off as their photo on Facebook. They gave my blog credit for the recipe with a link back, but posted the recipe on Facebook too. There was no real reason for someone to click the link. I bet the hundreds of people who shared the post had no idea. Lesson Learned: Watermarks can be cropped and no one likes plastering a watermark through the photo to make it visually unappealing.
[socialpug_tweet tweet=”I used to think just adding a watermark was good enough. How to Copyright #photos. #bloggingtips” display_tweet=”I used to think just adding a watermark was good enough.”]
You may be asking, How do I copyright my photos? You can add this information in the metadata of the photo and I will show you how. For this tutorial, I will be using Photoshop CS4.

How to Copyright Photos in Photoshop
So you have your beautiful photo you took and want to use in it your blog post. You want to protect the work that you have done. Assuming you have your photo open in Photoshop and all your edits are complete, it is time to add metadata to you photo. For the purpose of this tutorial, I will use the graphic above.
First, go to File->File Info
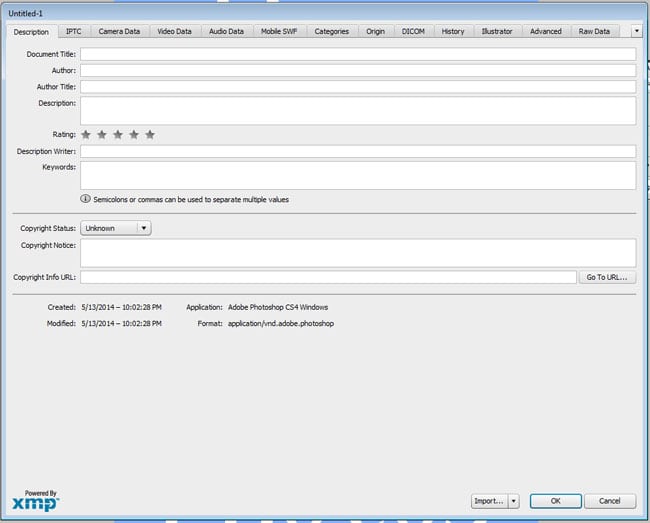
 It will bring up a box that looks like this:
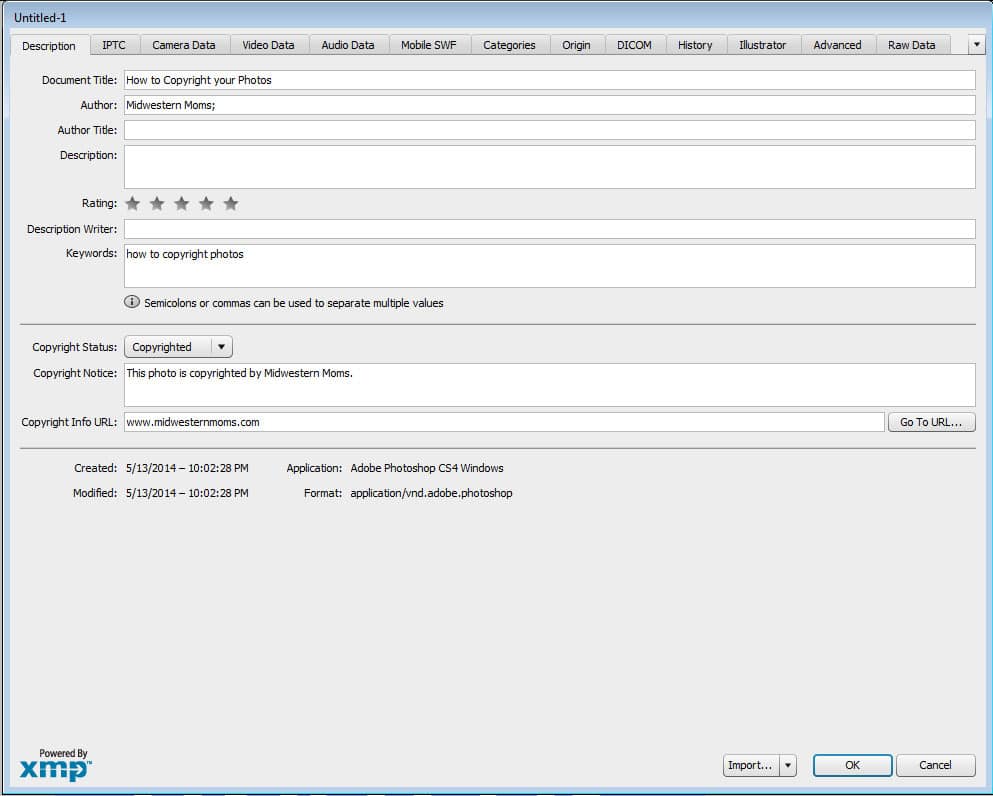
 Under the Description tab, fill out the following: Document Title, Author, Keywords, Copyright Status, Copyright Notice, and Copyright Info URL as a minimum. The Keywords will help your image turn up in Google image searches. Also, make sure you have your URL correct by clicking on the Go To URL button. Please keep in mind that by saying it is copyrighted, isn’t the same as applying for a legal copyright. However, this will deter most people from using your images.
Here is what mine looks like (click on the photo to bring it up larger if needed):
 Once everything is typed in, click OK. You will notice a copyright symbol located next to your document title.
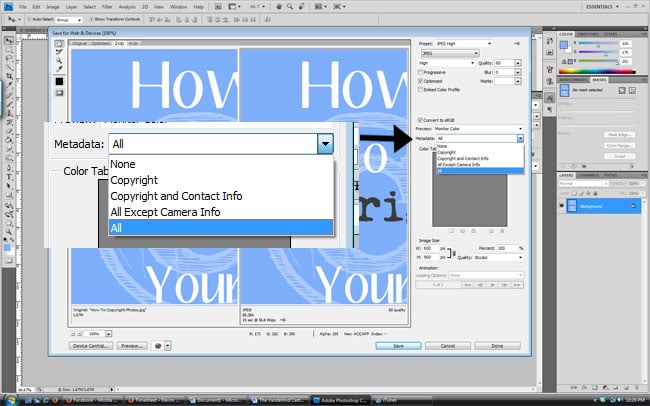
UPDATED (7/22/14): Now save your file for the web. When doing this, make sure you choose how much metadata you want saved with the file. Choosing “All” will save all your copyright information and camera information. Now you can upload your file to your site.
Want to see how to view this meta data? See my post on Finding Metadata in Photos.
You may notice I still use a small watermark at the bottom of some of my graphics. I do this just so people can visually see where it came from. I always make it small in a corner and I have the opacity down to 50 percent.
[socialpug_tweet tweet=”Great tutorial on how to place copyright information in #Photoshop. #blogging #photography ” display_tweet=”Great tutorial on how to place copyright information in Photoshop.”]
Have you been adding copyright information to the photo’s metadata? How have you been protecting your photos?

I really needed this information! Thank you so much for taking the time to write such a detailed post.
Your Welcome! Glad it was helpful.
Wow, awesome post! Thanks so much for the detail. This would have never occurred to me.
Your Welcome, Allison.
Some day I will download photoshop and reteach myself how to use it! So far I have been pretty lucky and no one has stolen my photos, only my content which unfortunately I can’t prevent them from doing.
I am sorry to hear that Mandy. :(
You can actually do all of this in camera without the use of Photoshop – depending on the camera. I have a Canon 700d & it allows me to add all the metadata in the camera. This makes it even more safe as opposed to adding it on afrerwards.
It would be great to be able to do this with the pictures I take with my iPhone and iPad!!!
Great job on the tutorial! I will definitely need this in the future. Thank you!
You’re welcome! Happy to help. :)
I needed this. Thank you!
Your Welcome.
Thank you!! I am adding this to my Sverve tips, too!
You’re Welcome. Thanks for the add!
Fantastic tutorial! You make it so easy, thank you!
It is very easy. Only takes a few more minutes when you are working on your photo.
I did this and it worked great! I was wondering how someone knows that your picture is copyrighted once it’s uploaded on a social network?
Mandy,
This is a good question. I personally do not post the actual image on social networks. I normally just post links. I found this article really helpful. Apparently, Social Media networks strip all information from the photos. Only Google+ and Tumbler keep the information. If you plan to post the photo on social media, I would make sure to add a watermark.
I will work on a post on how to find the metadata.
Thanks so much for this Devon! I really needed this and it came at just the right time! :D
Just FYI…our images are protected by Copyright Law from the moment we create them. We don’t have to do anything to have that protection in the US.
You can register a work with the copyright office. While regular copyright protection will allow you to get a photo removed if it was stolen…registering will allow for financial damages to be paid with suing. I am a photographer. I never register copyrights.
Always a good idea to add Copyright to metadata just for a source, but that can be deleted and re saved by the thief. Also , if you use the “Save for Web” in Photoshop, it will strip your metadata.
Hope that helps! Don’t want bloggers to be too bogged down with more to do!
Jill,
You are correct. Anyone can just delete the information and re-save the file with new information. However, I am glad you brought up the point about “Save for Web”. I missed a step in my tutorial. It is now updated. “Save for Web” does save your metadata. There is a drop down box for determining how much metadata is saved in the file. By choosing “All”, it saves the information you added and the camera information as well. I have also added a post on how to find metadata.
I personally do not find it bogging me down. I am already in the file information to add keywords to my images. It takes a minimal amount of time to file in the title, author, copyright, notice, and url.
Exactly what I was going to say. Your photos are already copyright protected, w/ or w/o the info placed on the photo or in the metadata. Better to REGISTER the copyright protected images, too. That’s the only way to seriously protect your rights of your images. I’ve posted more info on this FB page: http://www.facebook.com/MYPhotoOnline. I’m betting many of you have seen one of my famously “stolen”/”borrowed” images floating around social media already: http://klmarkert.smugmug.com. I’ve learned a lot since losing control of one of my own photos. ;)
Useful information to have…thanks for sharing!
You’re Welcome!
Thank you for writing this, great post and really useful information!
Just wanted to let you know that while it’s a great post, you are misspelling “You’re welcome” on every comment response. You are saying “your” instead of “you’re”. Just trying to help…..
Gah! I will go back and change them. I wasn’t thinking when I typed all those. Thanks for letting me know.
I am just starting my own home studio so i am sure to need this!!!! Thank you so much
How did I not know about this?! Thank you so so much for sharing! This is so awesome!
You’re Welcome Jennifer!
I had someone take one of the photos of our Champion dogs and tried to pass the dog off as their own on Facebook. I was alerted by someone else who recognized her and it took some doing but Facebook removed them plus they were inundated with emails from fellow breeders telling them how unethical they were. This will really help. Thank you.
Yes, Devon you’re right, there are image pirates all around us, they will download your photos> remove your watermark> and then use it on their own name. So, using image file info is the best way to copywriter your image
Is there a way to do this in bulk? like say you edited a bunch of photos in lightroom and then want to open them up in Photoshop add this to the photos?
Sam,
I am unsure about bulk editing. I am sorry. :(
Great article, will share for sure! Just a quick note….pinterest, facebook and I believe twitter all STRIP exif data when images are directly uploaded to their sites. So the watermark is what is left as the only means of making a potential thief move on to someone else’s image they don’t need to photoshop a watermark off of. The best bet is to upload images (if you want exif to stay intact) to flickr, 500px or your own website then “link” to those images on facebook as opposed to uploading them directly to facebook. I usually suggest people have their watermark say their web or blog address so that if someone is interested in legally using the image they can get in touch with the photographer ;-)
Thanks so much for this info. I never knew I would be able to copywrite my photos in this way. Will help a lot as I just officially started photography. :)
Is there a way to do it without photoshop? Thanks so much for your time & effort on a great post!
I am not sure. What program are you looking at?
It’s a great tutorial for beginner. I’m beginner it’s needed to me.
Hi Devon,
I just wanted to say thank you for this article.
It will be a great help for when I start selling my photos.
You’re Welcome! Good Luck!
There are many ways to do this without the full version of Photoshop (the learning curve is quite steep). Use Photoshop Elements instead or Irfanview (free & very popular). All of the copyright information can be added to the photos during the import process in Lightroom, thus eliminating the need to do it one at a time.
Thank you for the insight!!
Something tells me that you don’t understand what a copyright is.
Something tells me you didn’t read the whole article. I state this: “Please keep in mind that by saying it is copyrighted, isn’t the same as applying for a legal copyright.”
Great article, thank you for sharing this information.
Although this is great info and is the first step, your photos are not truly copyrighted until they are filed in the Federal copyright office. Copyright.gov. It’s a relatively easy thing to do and if you create small enough photos you can batch several hundred photos for just one filing fee. From what I’ve learned, this is the first thing a court will look at. Check it out.
Your opening statement is incorrect. Copyright is inherent in the creation of a thing. What you refer to is the ability to seek damages in a US court for copyright infringement. That’s when it needs to be registered.
In Photoshop, you can add your copyright watermark to your photos with a few simple steps. Begin by creating a new layer and typing your copyright text. Use the Text Tool to format the text with size, font, weight and color. Position the text where you would like it to appear. Finally, adjust the opacity of the text layer to blend your watermark into the photo. Good luck!